
 I made this card for the Paper Piecing Challenge in the Moxie Fab World. I started by stamping the Bird Collage stamp on beige cardstock. I then stamped this image on many patterned papers. I stamped the main flower on three different patterned papers and cut out three different sizes of the flower. Each piece was layered on top of the other with glue dots to add dimension and height. Each small leaf was cut out and glued directly to the beige cardstock. I only glued the centers of these leaves so the edges could be lifted up slightly. The small white flower petals were glued in the centers only and the edges of the petals were curled up for additional dimension. The yellow center is cut from yet another patterned paper. The bird is cut from a blue patterned paper and a glitter pen was used for interest on wing. I added another patterned paper to the lower third of the card and divided it from the main image with a black and white ribbon. A beige button was added to the ribbon and from that I was able to tie a small tag that I made and stamped with the sentiment. TFL!
Monday, March 14, 2011
Bird Collage
I made this card for the Paper Piecing Challenge in the Moxie Fab World. I started by stamping the Bird Collage stamp on beige cardstock. I then stamped this image on many patterned papers. I stamped the main flower on three different patterned papers and cut out three different sizes of the flower. Each piece was layered on top of the other with glue dots to add dimension and height. Each small leaf was cut out and glued directly to the beige cardstock. I only glued the centers of these leaves so the edges could be lifted up slightly. The small white flower petals were glued in the centers only and the edges of the petals were curled up for additional dimension. The yellow center is cut from yet another patterned paper. The bird is cut from a blue patterned paper and a glitter pen was used for interest on wing. I added another patterned paper to the lower third of the card and divided it from the main image with a black and white ribbon. A beige button was added to the ribbon and from that I was able to tie a small tag that I made and stamped with the sentiment. TFL!
Thursday, January 27, 2011
Cardinals in the birches
 We've been having so much snow here lately that I decided to make a card with a snowy feel. I was inspired by the Hero Arts Tree Trunks stamp (S5477). It looks like birch trees in winter to me so I though it would be perfect. We have quite a few cardinals in our yard hunting for food so I thought they would complete the scene. I made the cardinals with a Martha Stewart punch and Distress ink colored white cardstock. I made both red and a color that looks like the female cardinal to punch them from. I chose a dark gray cardstock for the main card and I white embossed the trees. I matted the card on the same red that I used for the male cardinal and then adhered the whole thing to a white card. Enjoy winter! TFL!
Our house on the hill

For this project, I was inspired by the Mi Casa set (CL389) from Hero Arts. I started by Distress ink coloring the blue sky on white cardstock. I then overstamped the sky with the Flourish background stamp (CG119) in white ink. I then colored another piece of white cardstock with multiple colors of Distress inks to make the ground. I cut the paper into a hill shape and adhered it to the main sky paper. I stamped one of the houses on a patterned paper, a solid brown paper, and also on the sky and ground paper. I cut out the base of the house from the patterned paper and the roof from the brown paper and glued them to the main paper. I stamped and cut the birds from yellow and magenta patterned papers and arranged them in the sky. I stamped the tree and colored with markers. I stamped Welcome in black ink with the Bird Branch alphabet (CL138). For more interest, I decided to cut the image into six equal pieces and frame the whole thing. This now hangs in my entryway (photo below). I ended up making a couple of these as presents this past Christmas for family. TFL!
 the project hanging in our entryway
Thursday, October 28, 2010
Hero Arts Bird Ornments
 Stamps: Hero Arts Design Block Flourish and Seasons Greetings sentiment
Here are some bird ornaments I made with a Hero Arts stamp I enlarged with a copier. I cut each bird from mat board and then colored with Distress Inks. I then used the Flourish stamp with Versamark on the body of each bird and then used gold embossing powder (white/silver embossing powder was used on the lower bird). For the wings, I used the Seasons Greetings sentiment from Hero Arts and stamped it all over each wing in gold ink (white for the lower bird). I then punch small holes in the mat board to thread the ribbon for hanging. Closer bird shots below. TFL!


Tuesday, October 26, 2010
Autumn pears
 Stamps: sentiment and design on pears - PaperTrey Ink, pears - unknown
Here is another autumn card. I used this pear stamp though I have no idea who made the stamp since I bought it used. I stamped the pears on a gold patterned paper and then again on a green patterned piece. I cut each image out and then paper pieced the pears and leave together on a third patterned paper. I then added some distress ink to the leave and then more to the pears to add deeper color. I added an additional design to the pears with a design from Papertrey Ink. I adhere all of this to a medium brown card. Lastly, I stamped the sentiment in brown ink to the bottom of the card. TFL!
Monday, October 25, 2010
An enhanced autumn leaf
 Stamps: Hero Arts - Design Block Flourish and Purple Onion - Seasons
I was out for a walk this morning and found this leaf. I thought that I would try and emboss it and it worked! I decided to used Judi Kins egyptian gold embossing powder because it has some additional sparkle to it. What I did notice is that the heat darkened the leaf a bit but not enough to worry about. Once it was complete, I used Glossy Accents to glue the leaf to the ivory card. Lastly I stamped the sentiment in dark brown ink. A very simple card where the leaf is the star. TFL!
 Detail of embossed leaf
Saturday, October 23, 2010
I won Magenta's heart!
 Click on the Magenta image above for their post about my card.
Thanks so much Magenta!
Monday, October 4, 2010
Offset Scallop Gallop Challenge in the Moxie Fab World
 I came across this post named Offset Scallop Gallop Challenge in the Moxie Fab World and thought it would be a great place for me to post this floral card I made with hundreds of overlapping circles. I cut each circle with a 1/8" circle punch from patterned paper that I enhanced with Distress Inks. I posted this project on my blog last month, after I originally finished it. It had a black vase since I just couldn't punch any more circles. After I saw this post today, I dug the card out and finished it off with a white vase that I dry embossed with a Cuttlebug folder. TFL!
 Detail of the overlapping, tiny circles. *Please click on the image to see the detail.
Tuesday, September 7, 2010
Pointillism with paper
 Supplies: Magenta laser-cut Garden Greetings card, Paper Trey Guide Lines stamp, Distress ink, 1/8" circle punch
I was given this plain white, laser cut, Magenta Garden Greetings card and the first thing that came to mind was to cover the whole thing in tiny dots of color. Crazy, I know (now, that is, after I've given myself a bad ebow from all the dot punching ;-) To start, I decided to use some scrap patterned papers and rub Distress inks over them to give some depth to the color. Then I got to punching the hundreds of dots with an 1/8" circle punch! I started gluing each tiny dot, beginning with the pink coneflowers and then moving around to the orange tulips and finally the green leaves. I couldn't do anymore. My elbow gave out so I decide to color the vase with black Distress ink (to help tie in the black coneflower centers) and then stamped a design on the vase with a Paper Trey stamp. I then added tiny dots of Glossy Accents to highlight the stamp detail. You can see the details of this on the photo below. Make sure to click on it to enlarge it too. TFL!
 Detail of the dots - Definitely CLICK on the image above.
I apologize for these poor photo images. I just couldn't get the colors right no matter what I did. The colors are much prettier in person. Again, thanks for looking!
Monday, August 30, 2010
Color Cue {7} Challenge
 Stamps: Hero Arts & Paper Trey
The Color Cue {7} Challenge uses aqua, gold, red and white/cream and here's my take on it. I used Distress Inks on white cardstock for the solid colors under each flower. I stamped the flowers in black ink on white cardstock and then used aqua, gold and red colored pencils. Each flower image was then matted on black cardstock and foam mounted to the colored rectangles for more interest. I adhered the flower images to white cardstock that was embossed with a Cuttlebug dot folder. It was then matted with black and then adhered to a white card. I added the sentiment at the bottom to finish it off. TFL!
 Detail of flowers
Wednesday, August 11, 2010
EDIT * Winner of Embellish Magazine Challenge with Birds

*Edit* I won this challenge and I'm thrilled. I was blown away when I went to their web site and saw my tags with the little winner badge on them. So fun to make. Since I had a few things leftover from making the birdhouse for this Embellish Magazine challenge, I thought I would make some gift tags, using the same criteria for the challenge, and submit these also. I couldn't get all the detail photos to upload on this post so there is another post below for all the details and close up photos.

More details of the gift tags
 Supplies: SpellBinders die, Hero Arts tree stamp and sentiment, Tiny birds by Memory Box
 Supplies: Bird stamp - Savvy Stamps, Sentiment - Hero Arts, SpellBinders die, punches
 Supplies: SpellBinders die, Sentiment; Memory Box, Background stamp; Stampendous, Bird; Invoke Arts, punch, Distress Ink
 Supplies: Bird stamp - Stampsmith, Background leaves - PaperTrey Ink, Distress Ink, punch
 Supplies: SpellBinders die, Sentiment - PaperTrey Ink, punches
Birthday Wishes
 Supplies: Stamps; flowers - Hero Arts, sentiment - PaperTrey Ink
My girlfriend's birthday is next week so I thought I would make her card in the challenge colors for Embellish Magazine that I had leftover on my desk but without the bird this time. I colored the magenta cardstock with Distress Ink and then stamped two sizes of flowers and cut them out. The leaves were cut from a green patterned paper. The tiny white flowers in the center are from a punch. The main card is cut from brown cardstock using a SpellBinders die. The sentiment was white embossed. I finished her card off with tiny white dots around the outer edge and a gold gel pen for the flower centers. TFL!
Embellish Birds Color Challenge - Birdhouse
 Supplies: All stamps - PaperTrey Ink, Punch; Martha Stewart, Distress Ink
Now that I'm back from vacation, I thought I would try the Embellish Magazine challenge. The challenge is to use brown, green, and magenta along with a bird. For this entry I decided to make the card from a birdhouse shape. I cut piece of white cardstock and started to color it brown with Distress Ink. To make the clapboard on the house, I cut a thin piece of cardstock and used it as a mask and moved it a half inch all the way down the piece of cardstock, each time applying the ink over it. This gave the shading I was looking for to mimic the clapboard. I used a lime chalk ink for the all the leaves which I cut out and applied to the house. The bird was cut from magenta cardstock that I first clear embossed with polka dots and a square design was used on the wing. I cut a very dark brown circle for the birdhouse opening. I used white cardstock and a punch for the roof's gable. To finish it off, I added the bird's eye and the sentiment. TFL!
Friday, July 23, 2010
2S4Y Challenge
 Above is the sketch challenge from 2 Sketches 4 You. Below is my take on it.
 Stamps: Butterflies - Hero Arts, Background - Impression Obsession, Sentiment - Stampendous
I stamped the background stamp on white cardstock with black ink. For the butterflies, I stamped them with Versamark and then used black embossing powder. These butterflies were colored with my boys watercolor paints in blues and greens (I'm still away on vacation and only have some basic tools with me so I'm using the kids' stuff).

I decided to cut the background image in between the flowers for the scallop portion of the sketch. I cut a small piece of patterned paper I had in my scrap container and then stamped 'hello' in black ink. I raised up the butterflies with foam tape and placed them in the same spots on the sketch. I matted the whole thing on black cardstock and then on a white card. TFL!
Thursday, July 22, 2010
A Warm Hello
 Stamps: Hero Arts, Poppies - CL449, Sentiment - LL154
I started this card by adding barn door distress ink to an orange piece of cardstock to make a poppy red color. For the floral panel, I started by using peeled paint distress ink over white cardstock. I then went around the edges of the panel with walnut stain distress ink. I stamped the poppies in brown ink on the green panel. I also stamped the poppies on a piece of white cardstock that i colored a poppy color with multiple distress inks. I cut each of the poppies out and glued them to the green panel. To finish it off, I stamped 'a warm hello' to the lower right of the card. TFL!
Saturday, July 17, 2010
Summer Sunflower
 Supplies: AccuCut Sunflower die, Cuttlebug Embossing folder, Ranger alcohol Inks,
 Stampendous stamp, Martha Stewart punch
Since I'm still away for a few more weeks, I thought I would post an older card I have on my computer. This sunflower was cut from an AccuCut die using glossy white paper. I then used alcohol inks to color the flower and stem. For the center of the flower, I punched two flower shapes and layered them together. I then glued black beads to the very center. The black background paper was embossed with a Cuttlebug folder and then stamped with the word smile in white ink. I then glued everything on a white notecard. TFL!
Monday, July 5, 2010
Wplus9 Color Cue challenge
 Stamp: Impression Obsession, My Sentiments Exactly, Punch: Martha Stewart
The current Color Cue challenge at Wplus9 uses the four colors above, aqua, brown, orange, and green. I started by using Versamark and stamping the Impression Obsession image on brown cardstock. I then used the same stamp and clear embossed it on orange and aqua cardstock. I punched the flower shape from the orange and aqua cardstock. I punched nine green squares and glued them in a grid pattern to the brown cardstock. I glued eight orange flowers and one aqua flower to the squares. I trimmed the brown cardstock to an 1/8" from the bottom of the aqua card so there's a small reveal of aqua showing at the bottom of the card. I finished off the card by gluing orange and aqua beads to the centers of each flower. Lastly, I stamped 'be different' in white ink from the My Sentiments Exactly alphabet. TFL!
Tuesday, June 29, 2010
Embellish Magazine baby card challenge
 Stamp is by Stampotique Originals
Card size: 5 1/2" x 4"
Embellish Magazine baby card challenge details are to use yellow, green, peach and cream as well as having a baby theme to the project and this is what I came up with. It totally not a scheme I use regularly so it was a bit of a challenge for me. In fact, I went out and bought a piece of peach paper for it ;-)
I stamped the image in brown ink on three patterned papers and then again on the cream colored card. I then cut out each piece from the different patterned papers and paper pieced the whole thing together. I then used all the patterned papers to build up the frame around the image. I added Glossy Accents to the center of the flower saying to emphasize it. I then glued everything to the cream card and added three cream, heart shaped buttons to the bottom. TFL!
 Detail of paper piecing. As a side note, the colors in these photos seem a bit dull. No matter what I did, I couldn't quite get them to photograph correctly.
Monday, June 28, 2010
Dress challenge
 Stamp: Stampington & Co. - Wrought Scroll, Punches: Martha Stewart
Card size: 6" x 4 1/4"
In the latest issue of Stampers' Sampler, there is a dress template up for challenge and here's my take on it. I decided to use white and cream. After cutting out the dress shape from white cardstock, I first added white origami paper to the bottom of the dress for a slip. I then cut out another dress shape from white cardstock and cut the bottom with a border punch. I used another piece of the origami paper and used it for the bodice of the dress. I then started gluing on the countless tiny punched cream flowers I made with the hydrangea punch (I used the smaller of the two flower sizes).
 After adhering all the flowers, I overstamped them with the Wrought Iron stamp in white ink. I then used white embossing powder for a bit of shine. You can sort of see the design on the dress above.
 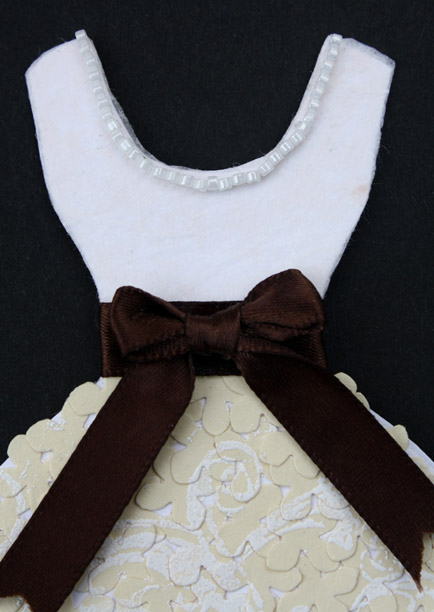 I then added tiny white beads to the neckline and bottom of the dress. I also added a dark brown satin bow that I tied and then glued in place with Glossy Accents.
Here you can see the stamping over the flowers.
 And a close-up of the flowers and the beads that follow the bottom detail of the dress. To make the whole thing a card, I cut a third dress shape from white cardstock and glued it to the back of the decorated dress, from the waist up, with more Glossy Accents. TFL!
Subscribe to:
Posts (Atom)


