Showing posts with label hero arts. Show all posts

Thursday, October 20, 2011

I've been published in Paper Crafts Holiday Cards

I've been holding on to this post for awhile now and now I'd like to let you guys know that a project of mine was published in the latest Paper Crafts Holiday Cards and I am THRILLED!


I submitted this sled ornament last May and it was selected! Oh so happy! ;-) Here are the details:
1. Start by drawing the sled’s elements on white mat board then cut with a craft knife.
2. Color all boards with warm red chalk ink and rails with metallic gray acrylic paint. Let dry completely.
3. Using the fine black marker, draw woodgrain lines on all the boards.
4. Using Glossy Accents, glue all the pieces into the sled shape.
5. Stamp the holly image on white cardstock and color with pencils.
6. Cut three 2” pieces of silver wire and spiral one end. Start by bending a small bit of wire and then continue winding just with your fingers. Glue to sled’s steering board.
7. Adhere holly over wires and top with red glass beads.
8. Punch multiple white snowflakes and glue to sled in a random pattern.
9. Stamp sentiment on white cardstock and hand cut into curved banner shape. Add stitches to banner with black marker and glue to sled.
10. Lastly, add metallic silver hanging thread.

Rubber Stamp: Seasons’s Greetings, C2853 Hero Arts
Clear Stamp: Holly, Pattern Play Holiday Set Inkadinkado
TFL!

Saturday, October 1, 2011

*EDIT* I won a guest designer spot on Penny Black Blog for these Three Pointsettias

Thought I would do an untraditional Christmas card today using the Penny Black pointsettia. The whole card and flowers started with white cardstock. For the green flower, I first stamped in shabby shutters Distress Ink and then colored the flower with old paper Distress Ink. The white flower is just stamped in an aged gold ink. For the red flower, I stamped in Versamark and then used gold embossing powder. I colored the flower with fired brick Distress Ink. The card itself was completely colored with vintage photo Distress Ink. I adhered the flowers with foam tape for dimension. I stamped the Noel with a Hero Arts alphabet, in gold ink. Lastly, I used gold Stickles for the center of each flower and framed the outer edge with a gold leaf pen. TFL!

Thursday, September 1, 2011

Featured Artist at Stampbord.com

I was asked by Stampbord to do a step by step, for this box above, and to be featured on their web site for September and October. If you'd like to check it out, just click Stampbord.com

TFL!

Sunday, June 5, 2011

Spring Tree

I made this card for the Penny Black blog challenge using borders. I decided to make a postage stamp for the main image using two Penny Black stamps. I colored the tree image in blues and green and then spritzed it with pearlized water and then stamped on white cardstock. I then cut a mask of the tree. After the mask was in place, I stamped the script in Versamark ink and covered it with clear embossing powder. After it was heat set, I used green Distress ink to color the panel, keeping the mask in place. I used Staz-on black ink to stamp the 45c for the postage stamp. I then used an EK Success postage stamp border punch to create the white panel. I adhered both pieces to a black & white polka dot patterned paper. I then cut a blue piece of cardstock to size and used the envelope patterned background stamp from Hero Arts. It seemed a perfect choice to use the envelope patterned stamp since the main image was a postage stamp. I then stamped 'spring' from Purple Onion Designs. Lastly, I adhered the whole thing to a white card. TFL!

Friday, May 20, 2011

Stamp Group Challenge

I get together with a great bunch of people every month at our LSS. In April, we all brought in a stamped image to exchange with another person. The challenge was to take it home and make a card with it for the following month. I got two images. The first was this owl that was stamped in black on white cardstock. I thought it looked like it should be in a tree so I drew this tree on brown cardstock and cut it out. I overstamped it with Hero Arts Magical Background stamp in brown ink. I punched the hole in the tree with a large oval punch. For the main card, I started with a white card that I colored with Distress ink to color the sky then overstamped it with the same Hero Arts background stamp in blue. Before gluing the tree to the card, I used black Distress ink to color the back of the punched hole where the owl sits. I punched the green leaves, with a petal punch, from green stock that I stamped with a leaf pattern. I glued these on, bending some for dimension. I colored the owl with watercolor pencils, cut it out and finished with Glossy Accents for the eyes. I cut a small tag down to size and stamped hello with a Papertrey stamp in black ink and tied it on with twine.


The second image I received was this bird sitting on these branches, stamped in black, brown, and red on yellow cardstock. I first punched the image out with a large scallop punch. I punched what was left over of the plain cardstock with a large scallop border punch and set aside. For the main card, I chose white and glued a patterned paper to it that had a small amount of red to go with the heart on the tail of the bird. I used a coordinating paper with the left over stock and used it for the left border. I tied the to elements together with red grograin ribbon topped with a small white ribbon. I cut a small tag and stamped a Papertrey sentiment in black ink and attached it with the white ribbon. I pop dotted the main image and adhered it to the card. Since the coordinating paper didn't have any red on it, I used colored pencils to add some along with some white. I aslo added white dots to the background paper and the heart with a white marker to tie it all together. TFL!

Monday, May 2, 2011

Mother's Day 2011

All stamps Hero Arts; CL449, CG245 & CL477

I made this card for my mom for Mother's Day this weekend. She likes rose but I don't have a rose stamp. I thought I could fake it a bit with these poppy flowers and this leaf stamp. I stamped the poppies in Shabby Shutters Distress Ink on white cardstock. I added yellow centers with colored pencil. I then cut out a few select poppies for this card. I colored more white cardstock with the same green ink and then stamped the leaf stem and cut it out. For the background, I took more white cardstock and colored with Spiced Marmalade Distress Ink. I stamped the Classic Fabric Design stamp with Versamark ink and then used clear embossing powder. I then covered the image with Fired Brick Distress Ink. I scratched the edges of the image with the edge of my scissors to expose the white core. I adhered the panel to a green card which I distressed the edges in more green ink. I foam dotted the leaves and flowers to the panel and added a green ribbon. I finished off the card with a white bow. TFL!

Tuesday, April 12, 2011

Thinking of you

All stamps are Hero Arts; S5477, K5242, CG152, LL154

I started this card by stamping the tree trunks in brown chalk ink on white cardstock. I then stamped the big pine bough in green chalk ink and the bird in brown. I used Distress ink on the tree panel. I colored the pine bough with Distress ink just near the center of the needles and worked outwards to a fade. The bird was colored with two colors of blue Distress ink. I adhered the tree panel to a green card and then cut thin brown strips of cardstock to outline the panel - for a kind of lodge look. I stamped the sentiment in brown chalk ink and finished the card off with Distress ink around the outer edge. TFL!

Monday, March 14, 2011

Bird Collage

I made this card for the Paper Piecing Challenge in the Moxie Fab World. I started by stamping the Bird Collage stamp on beige cardstock. I then stamped this image on many patterned papers. I stamped the main flower on three different patterned papers and cut out three different sizes of the flower. Each piece was layered on top of the other with glue dots to add dimension and height. Each small leaf was cut out and glued directly to the beige cardstock. I only glued the centers of these leaves so the edges could be lifted up slightly. The small white flower petals were glued in the centers only and the edges of the petals were curled up for additional dimension. The yellow center is cut from yet another patterned paper. The bird is cut from a blue patterned paper and a glitter pen was used for interest on wing. I added another patterned paper to the lower third of the card and divided it from the main image with a black and white ribbon. A beige button was added to the ribbon and from that I was able to tie a small tag that I made and stamped with the sentiment. TFL!

Thursday, January 27, 2011

Cardinals in the birches

We've been having so much snow here lately that I decided to make a card with a snowy feel. I was inspired by the Hero Arts Tree Trunks stamp (S5477). It looks like birch trees in winter to me so I though it would be perfect. We have quite a few cardinals in our yard hunting for food so I thought they would complete the scene. I made the cardinals with a Martha Stewart punch and Distress ink colored white cardstock. I made both red and a color that looks like the female cardinal to punch them from. I chose a dark gray cardstock for the main card and I white embossed the trees. I matted the card on the same red that I used for the male cardinal and then adhered the whole thing to a white card. Enjoy winter! TFL!

Our house on the hill


For this project, I was inspired by the Mi Casa set (CL389) from Hero Arts. I started by Distress ink coloring the blue sky on white cardstock. I then overstamped the sky with the Flourish background stamp (CG119) in white ink. I then colored another piece of white cardstock with multiple colors of Distress inks to make the ground. I cut the paper into a hill shape and adhered it to the main sky paper. I stamped one of the houses on a patterned paper, a solid brown paper, and also on the sky and ground paper. I cut out the base of the house from the patterned paper and the roof from the brown paper and glued them to the main paper. I stamped and cut the birds from yellow and magenta patterned papers and arranged them in the sky. I stamped the tree and colored with markers. I stamped Welcome in black ink with the Bird Branch alphabet (CL138). For more interest, I decided to cut the image into six equal pieces and frame the whole thing. This now hangs in my entryway (photo below). I ended up making a couple of these as presents this past Christmas for family. TFL!
the project hanging in our entryway

Thursday, October 28, 2010

Hero Arts Bird Ornments

Stamps: Hero Arts Design Block Flourish and Seasons Greetings sentiment

Here are some bird ornaments I made with a Hero Arts stamp I enlarged with a copier. I cut each bird from mat board and then colored with Distress Inks. I then used the Flourish stamp with Versamark on the body of each bird and then used gold embossing powder (white/silver embossing powder was used on the lower bird). For the wings, I used the Seasons Greetings sentiment from Hero Arts and stamped it all over each wing in gold ink (white for the lower bird). I then punch small holes in the mat board to thread the ribbon for hanging. Closer bird shots below. TFL!


Monday, October 25, 2010

An enhanced autumn leaf

Stamps: Hero Arts - Design Block Flourish and Purple Onion - Seasons

I was out for a walk this morning and found this leaf. I thought that I would try and emboss it and it worked!
I decided to used Judi Kins egyptian gold embossing powder because it has some additional sparkle to it. What I did notice is that the heat darkened the leaf a bit but not enough to worry about. Once it was complete, I used Glossy Accents to glue the leaf to the ivory card. Lastly I stamped the sentiment in dark brown ink. A very simple card where the leaf is the star. TFL!

Detail of embossed leaf

Monday, August 30, 2010

Color Cue {7} Challenge

Stamps: Hero Arts & Paper Trey

The Color Cue {7} Challenge uses aqua, gold, red and white/cream and here's my take on it. I used Distress Inks on white cardstock for the solid colors under each flower. I stamped the flowers in black ink on white cardstock and then used aqua, gold and red colored pencils. Each flower image was then matted on black cardstock and foam mounted to the colored rectangles for more interest. I adhered the flower images to white cardstock that was embossed with a Cuttlebug dot folder. It was then matted with black and then adhered to a white card. I added the sentiment at the bottom to finish it off. TFL!
Detail of flowers


Wednesday, August 11, 2010

More details of the gift tags

Supplies: SpellBinders die, Hero Arts tree stamp and sentiment, Tiny birds by Memory Box


Supplies: Bird stamp - Savvy Stamps, Sentiment - Hero Arts, SpellBinders die, punches


Supplies: SpellBinders die, Sentiment; Memory Box, Background stamp; Stampendous, Bird; Invoke Arts, punch, Distress Ink


Supplies: Bird stamp - Stampsmith, Background leaves - PaperTrey Ink, Distress Ink, punch


Supplies: SpellBinders die, Sentiment - PaperTrey Ink, punches

Birthday Wishes

Supplies: Stamps; flowers - Hero Arts, sentiment - PaperTrey Ink

My girlfriend's birthday is next week so I thought I would make her card in the challenge colors for Embellish Magazine that I had leftover on my desk but without the bird this time. I colored the magenta cardstock with Distress Ink and then stamped two sizes of flowers and cut them out. The leaves were cut from a green patterned paper. The tiny white flowers in the center are from a punch. The main card is cut from brown cardstock using a SpellBinders die. The sentiment was white embossed. I finished her card off with tiny white dots around the outer edge and a gold gel pen for the flower centers. TFL!


Friday, July 23, 2010

2S4Y Challenge

Above is the sketch challenge from 2 Sketches 4 You. Below is my take on it.


Stamps: Butterflies - Hero Arts, Background - Impression Obsession, Sentiment - Stampendous


I stamped the background stamp on white cardstock with black ink. For the butterflies, I stamped them with Versamark and then used black embossing powder. These butterflies were colored with my boys watercolor paints in blues and greens (I'm still away on vacation and only have some basic tools with me so I'm using the kids' stuff).

I decided to cut the background image in between the flowers for the scallop portion of the sketch. I cut a small piece of patterned paper I had in my scrap container and then stamped 'hello' in black ink. I raised up the butterflies with foam tape and placed them in the same spots on the sketch. I matted the whole thing on black cardstock and then on a white card. TFL!

Thursday, July 22, 2010

A Warm Hello

Stamps: Hero Arts, Poppies - CL449, Sentiment - LL154

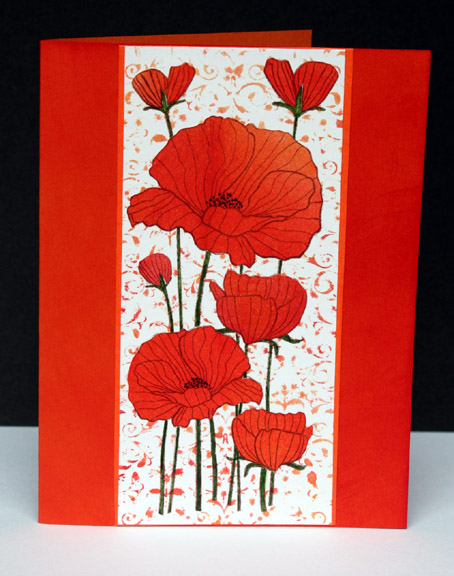
I started this card by adding barn door distress ink to an orange piece of cardstock to make a poppy red color. For the floral panel, I started by using peeled paint distress ink over white cardstock. I then went around the edges of the panel with walnut stain distress ink. I stamped the poppies in brown ink on the green panel. I also stamped the poppies on a piece of white cardstock that i colored a poppy color with multiple distress inks. I cut each of the poppies out and glued them to the green panel. To finish it off, I stamped 'a warm hello' to the lower right of the card. TFL!

Thursday, June 24, 2010

More poppies

All stamps Hero Arts; poppies - CL449, background - S5264

I had some poppies left over from the previous card and decide to make another. To make the background, I used the Antique Flower stamp and inked it with a few different colors of distress inks. I then misted the stamp with plain water and stamped it on white cardstock. I cut out all the distress colored poppies and paper pieced them to the white background. I colored the stems with a marker. I then adhered the white panel to an orange piece of cardstock. I then glued the poppy panel to the poppy colored card. TFL!

Wednesday, June 23, 2010

California poppies

All stamps Hero Arts; gate CG180, poppies CL449

Since returning from sunny California, I thought it appropriate to stamp some poppies. I colored an orange piece of cardstock with barn door distress ink to make the poppy colored card. I then sprayed it with Perfect Pearls in water. For the floral image, I used peeled paint distress ink over white cardstock for the green color. I then stamped the poppies in brown ink on white cardstock that i colored this poppy color with multiple distress inks. I then cut each of the poppies out and set aside. I then made a mask of all the poppies and then stamped the gate with black ink over the mask. I then used black embossing powder on the gate. I then glued all the poppies on the card. I finished the edge with more distress ink. Once the green panel was on the card, I glued on three tiny black beads to the bottom of the card. TFL!

Thursday, May 27, 2010

Stampbord box

I took a class last weekend using Stampbord and I'm loving it! We were given a plain wood box and this is what I came up with. I inked the box, making sure to keep the center light and darker around the edges. I then overstamped this with the Hero Arts Manuscript stamp. The center medallion is an old stamp from Stamp It! that I borrowed. I wished I owned this stamp! ;-) I then got to scratching the image back. So fun! Added the Tim Holtz decorative feet and I was done.
Lined the box with some decorative patterned paper.

Here's a close-up of the scratched detail.

My girlfriend Michelle Ward is having a challenge on her blog here
which asks to challenge yourself with size. I choose to change my medium. I usually work with cards but I'm branching out ;-)

Here I thought I would show the small magnet I also made from a test piece. Nothing goes to waste. Hope you've enjoyed this post and TFL!